
Waterproof LED strip lights are one of the most commonly used and versatile lighting solutions in outdoor and wet environments due to their durability and versatility. However, when installing waterproof LED light strips, the length of the LED light strip is often not just right. Understanding how to cut and connect waterproof LED strips can help us better apply indoor or outdoor LED lighting systems. In this guide, we’ll provide step-by-step instructions on how to effectively cut and solder waterproof LED strip lights.
How to Cut Waterproof LED Strip Lights?
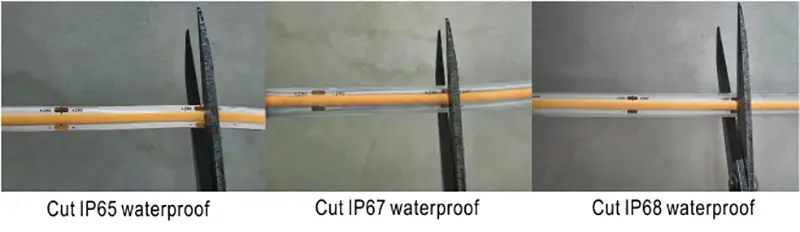
First confirm the installation dimensions, then find the cutting line of the waterproof light strip and cut it.
1: Gather necessary tools and materials
Before starting the cutting and joining process, have the following tools and materials ready:
- Waterproof LED strip lights
- Sharp scissors or LED strip cutting tool
- Soldering Iron and Solder
- heat shrink tube
- Silicone sealant
- electrical tape
- Wire strippers
2: Measure and size
Carefully measure the length of LED strip needed for your installation project and mark the cutting points with a pencil or marker. Use a ruler or tape measure to ensure accurate measurements.
3: Cut the LED Light Strip
Using sharp scissors or a dedicated LED strip cutting tool, cut the LED strip along the marked cutting points. Be sure to cut right side down, making sure to snip off the designated copper pads between the LED chips to avoid damaging the circuit.
How to Solder Waterproof LED Strip lights?
After you cut the waterproof LED light strips, learn how to solder them effectively. You can choose to use LED solderless connectors for fast, reliable, safe, and easy-to-use connections. You can also solder them together.
1: Prepare the cut waterproof LED strip
Prepare the LED strips to be cut to the required length and remove the waterproof coating from the cutouts. And expose the copper pads for connections. Use a knife to peel off the silicone waterproof layer near the solder joints of the cutting lines, and add tin to the solder joints and wires, respectively.
2: Solder the cut place
Carefully solder the exposed copper pads of the cut LED strip to the connector or the corresponding pads of another LED strip. Apply a small amount of solder to each pad and use a soldering iron to melt the solder and create a strong connection. Make sure the polarity (positive and negative) of the LED strip and connecting wires match.
3: Waterproof Sealed Connection
After welding the connection, insulate and seal the joint to maintain waterproof integrity. The joints are then glued and heat shrink tubing is put over them. To ensure they can be placed in humid or splashy environments. Make sure the heat shrink covers the entire weld area and provides a tight seal.
4: Apply silicone sealant (optional)
To further prevent moisture and water from entering, apply a small amount of silicone sealant to welded and heat-shrink joints. and allow it to dry completely before exposing the LED strip to moisture.
5: Test the connection
Before installing the LED strip lights, test the soldered connections to ensure proper functionality. Connect the LED strip to a power source and verify that all LEDs light up evenly.
6: Install LED Strip Lights
After testing and verifying that the soldered connections are correct, install the LED strip in the desired location. Use adhesive backing or mounting clips to secure the LED strips. Making sure they are positioned correctly and connected securely.
Conclusion
To understand how to cut and solder waterproof LED strip lights, you need to measure the length in advance and use the appropriate tools and materials. With this article’s step-by-step instructions, you can effectively cut and solder waterproof LED strip lights while maintaining their waterproof integrity and ensuring reliable performance outdoors and in wet environments. We are an LED strip light manufacturer, please contact us if you have any needs.
FAQs
Yes, measure the length of the waterproof LED strip. Then you use sharp scissors to cut to size on the cut logo. Be sure to cut them at the designated cutting points to avoid damaging the circuit and causing the LED strip to not light up.
Once we cut the waterproof LED strips, there are several ways to connect them. Including soldering and using solderless connectors. Soldering involves using solder to connect the copper pads of an LED strip, while connectors provide a safe and easy way to connect LED strips without soldering.
Yes, LED strips can be cut and connected to achieve custom lengths for specific applications. Cutting LED strips allows you to customize the length to suit your project requirements, while joining them allows you to create longer runs or join multiple sections together.
When we cut the waterproof LED strip lights, need to find the cutting points marked on the light strip. These cut points are typically represented by copper pads or cut lines along the length of the LED strip. LED strips must be cut precisely at these cutting points to avoid damage to the circuitry and to maintain waterproof integrity.
LED light strip waterproof connectors work by providing a secure and waterproof connection between two parts of an LED light strip. These waterproof connectors provide power and better protection against water ingress into the shear opening. Waterproof connectors ensure a reliable connection outdoors and in wet environments by inserting the cut end of the LED strip into the connector and locking it in place.